Early DIY s/c radio

Button pushers
Post Reply
User avatar
Shaun
Posts: 1057
Joined: 15 Feb 2018, 21:49
Location: West Yorkshire

Early DIY s/c radio

Post by Shaun »

Here's a few images of some old school single channel kits...
If you couldn't solder back in the day then unless you were minted, you basically didn't fly RC. Actually If you knew a Phil, Frank, Martin, Mike,Tobe, Ron etc then maybe you had another option - let them build it for you. :D
.
Kits from MacG
DSCF4602.JPG
The Ivy valve Rx ( it had pre wound coils to make things a little easier)
DSCF4604.JPG
And a few escapements etc
DSCF4613.JPG

Shaun
User avatar
tiptipflyer
Posts: 393
Joined: 16 Feb 2018, 22:49
Location: Germany

Re: Early DIY s/c radio

Post by tiptipflyer »

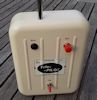
A few weeks ago, one of my elder clubmates gave me some old R/C parts designated for the trash can, to salvage some parts. Among those parts, I found the front part of a Graupner transmitter case, an old Telematic Servo, a partly salvaged Graupner valve receiver, a Metz Mecatron S/C transmitter etc. Here you see the Graupner transmitter which I cleaned up as good as possible and repaired it to full funtion again. It still looks very old and worn and the back cover is still missing, but it works.
I found out, that it is an old Graupner Standard 30 valve transmitter. In spring it will get a new paint job and the proper decals and a new back cover.
SAM_3092.JPG
SAM_3090.JPG
In the anode-battery dummy are 8 x 9V battery blocks for the required 75V. The 1.4V filament battery is a standard D size NiMH battery with a "new" cover.
By the way, the Telematic servo and the Mecatron transmitter are also repaired to full function.

Frank
User avatar
tiptipflyer
Posts: 393
Joined: 16 Feb 2018, 22:49
Location: Germany

Re: Early DIY s/c radio

Post by tiptipflyer »

Here you see a very old German S/C set. It is an OMU 215S transmitter with an OMU 205 receiver, both with electron tubes and in full working condition.
The transmitter has one valve and requires a 90V anode-battery (10x 9V block) and 1.4V fillament battery (1 C size NiMH).
The receiver has three valves and needs 45V anode-battery (5x9V) and 1 AA size Eneloop for fillament.
The Telematic S/C actuator works in compound mode and is very interesting, because it is full mecanic and is driven by a magnet which makes a lot of noise. (Sorry, my english is not good enough to explain, what is going on inside). It is the repaired Telematic, I got from my clubmate. It requires a 4-6V battery for operation.
SAM_3104.JPG
SAM_3105.JPG
SAM_3106.JPG
Cheers
Frank
User avatar
Shaun
Posts: 1057
Joined: 15 Feb 2018, 21:49
Location: West Yorkshire

Re: Early DIY s/c radio

Post by Shaun »

Great explanation Frank. If only my German was a 1/10th as good as your English.

Actually I know someone who has recently received a number on OMU sets....😁

Cheers,

Shaun
User avatar
tiptipflyer
Posts: 393
Joined: 16 Feb 2018, 22:49
Location: Germany

Re: Early DIY s/c radio

Post by tiptipflyer »

Here is a picture of the finished Graupner Standard 30 valve transmitter. It got a new paint job, new decals and the missing back cover was replaced by a homebrew one from a metal chocolate box.
SAM_3328.JPG
SAM_3330.JPG
Frank
Martin
Posts: 745
Joined: 16 Feb 2018, 14:11
Location: Warwickshire

Re: Early DIY s/c radio

Post by Martin »

Fantastic restoration Frank! It looks as good as new.
User avatar
Shaun
Posts: 1057
Joined: 15 Feb 2018, 21:49
Location: West Yorkshire

Re: Early DIY s/c radio

Post by Shaun »

Excellent Frank. I have a limited number of new old stock 1950's on off switches available I bought as used on many German transmitters such as OMU and other manufacturers transmitters of the day. If anybody needs one let me know.

Cheers,

Shaun
Post Reply